
Hello lovelies, and happy hump day!
To get you through the week, today we're sharing a dozen easy nail art patterns with some examples as inspiration + some bonus tips and tricks. This post is perfect for someone just dipping their toes in the nail art pool, as well as more seasoned nail artists that might not know all of our magical methods.


 |
| splodge | horizontal stripes + vertical stripes | rings | glitter gradient |
 |
| polka dots + French tip | diagonal tape half/half | gradient | saran wrap |
Do the Polka Dot
Personally I think dots are the #1 easiest and most fun nail art pattern that absolutely anyone can do! Anytime I debut a polka dot mani I instantly get great feedback, plus I find polka dots to be a relaxing way to pass the nail art time. There are SO many things you can create using dots - polka dots, rings, hearts, flowers, stars, etc. And the best part is that I 100% guarantee that there is already something inside your house that you can use as a dotting tool! Yes, really - you don't have to spend a single cent to start going dotty! Thumbtacks, flossers, pens, pencils, needles, bobby pins, bamboo skewers and toothpicks can all be used to get your dot on. |
| dot flowers | dot gradient |
1. First things first, master your dotting tools. One great way to practice your dots is by doing a dot gradient with different sized dots and colors. Like any gradient, you want to concentrate the dots in one area of your nail and do less dots as you move across (in my example I concentrated dots at the end of my thumb and did less dots towards my cuticle). Have fun with your dot gradient and overlap the dots, and use this random pattern to help learn placement!!
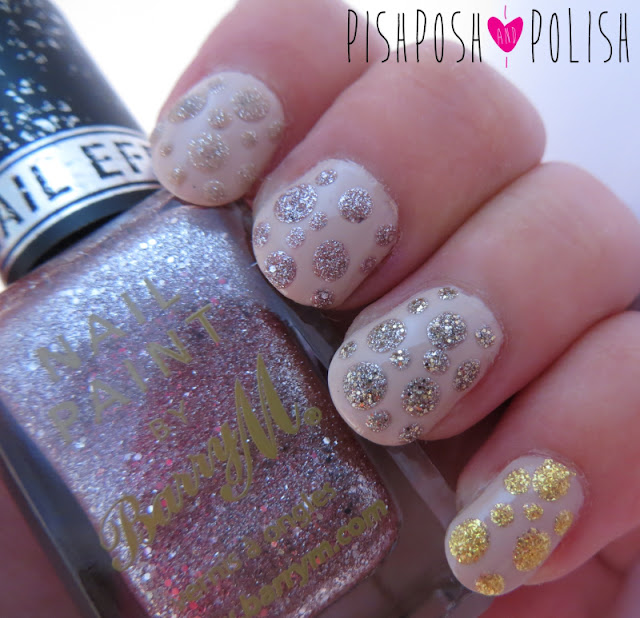 |
| from Kerrie at PishPosh and Polish |
2. Now that you've started to get the hang of dotting, let's do the regular 'ole polka dot. You can do your dots in a staggered grid or an 'even' grid. I like to keep the dots all on one finger the same size when doing polka dots in an ordered pattern like this, but play around with the general scale of your dots. Tiny polka dots look really complicated and cute, but they're equally as easy as medium sized dots!
 |
| EXTREME case of rings from Vic at Glowstars (dots on dots on dots!) |
3. Rings - using your newly found dot-power, double up on your dots to make rings! Do some dots, then go back after they have dried and do dots with the same polish as your base color to create the illusion of rings.
Tip: The ring 'illusion' works best for me if the polishes are all opaque in a single dot swoop; glassflecks or otherwise jelly-ish colors won't work as well as cremes or opaque shimmers.
 |
| from Emma at Manicurity |
4. Finally, dot flowers! Now that you are a dot master and have practiced the precise dot placement required for rings, take a crack at doing dot flowers. I use 5 dots for the petals, then another dot of a different color to make the center of the flower. You can also add smaller dot leaves if you want. Bonus: flick the end of the leaf dot out a little to make it more 'leaf' shaped.
Tip: The best way to get repeated dot success is to dip your tool in polish frequently (and obviously thorough cleaning between color changes). When I dab some polish onto my blobbing mat, I dome up the paint so that the spherical part of the dotting tool can be adequately covered in polish for polka perfection.
Super Stripes
Maybe you've taken the plunge and have purchased a nail art brush set or grabbed some brushes at the craft store to trim down. Now's the perfect time to venture into freehand stripes using a striping brush! The perfectly straight freehand line is a challenge, but here are some ideas to try out. |
| from Heather at Peace, Love & Polish |
1. Start with the classic french tip! This is an easy 'stripe' to try out and can be done with the brush straight from the polish bottle (my method of choice, just make sure you've wiped the brush on the inside neck of the bottle quite a bit before starting) or using a striping brush. I find horizontal stripes easier to keep straight than vertical ones.
2. Moving right along to horizontal stripes! I find stripes to be a bold and classic pattern, especially with the right colors. To make the striping process easier, I like to dip my striping brush directly into the polish bottle to get enough polish to work with; this helps me avoid having to go over the same line 192403284 times.
Tip: To get a straighter liner try to keep the striping brush steady in one hand and roll your nail (instead of keeping your nail still and moving the brush across it)
3. Finally, vertical stripes. Now that you are a striping master, move on to vertical stripes using the same tips from above.
 |
| BONUS: plaid from Vic at Glowstars |
Bonus: Combine horizontal and vertical stripes to make more interesting patters, like plaid!
Terrific Tape
More like terrifying tape! Just kidding! Tape manis are a whole different beast than typical freehand nail art because it requires a different kind of precision and patience. You can achieve amazing looks with tape if you have the time to let your polish dry (and a whole lotto quick dry top coat). A great pattern to start practicing tape manis with is the basic diagonal half-and-half. I like this 'pattern' because it's really easy to line up and do consistently on all of your fingers, just use a piece of tape from one corner of your nail to the opposite corner at the bottom, then paint your color on. Immediately remove the tape after you've painted on your second color to get a crisp line. |
| from Heather at Peace, Love & Polish |
Tip: Wait until your base coat is dry (super important), I usually wait about an hour even with quick dry top coat. Before putting the tape on your nail gently smoosh it on your hand a few times to reduce the tackiness.
Groovy Gradients
I really like gradients, they make a great backdrop for more complicated nail art but they also look pretty awesome all on their own. There are two fun ways to get a gradient - just with polish colors, or with glitter! Gradients can take a little bit of time and patience to build them up depending on the polishes you choose. |
| from Sue at Creative Nail Design by Sue |
1. An easy way to start out is the basic two color gradient. I use cheap-o sponge makeup wedges and I run them under the faucet and squeeze the excess water out before starting. I really do think the water trick works because I rarely get pieces of sponge stuck to my nails anymore! I paint directly onto the sponge with the brushes from the bottle and I purposefully overlap the colors in the middle to make a third mixed shade. If you want a really smooth fading transition, you'll like the mixing trick! If your colors don't mix well or you don't like the middle color they're making, just pick a third color to dab in for the transition.
Tip: Complimentary colors make brown when mixed, so it would be hard to go from red to green in a gradient and you would need to pick a third shade for the middle
Tip #2: If you are using more sheer colors (i.e. a polish that typically takes 3-4 coats to be opaque on it's own), then save yourself some time and heartache by putting down a neutral 'undies' color like beige, white, or silver. Nothing is worse than being impatient with your gradient on the 4th coat and gouging the layers or smooching all of the polish off your nail and back into the sponge because you didn't wait between coats :-/
 |
| from Shelly at Sassy Shelly |
2. GLITTERRRRR Gradients are really pretty, and very much a classic nail art look to me [I mean how many times can we see the same absolutely gorgeous gold glitter gradient on a putty colored polish float from Pinterest to Tumblr and back amirite?]. You can do a glitter gradient just using the brush from the bottle (my preferred method, because lazy) or grab your trusty water-soaked sponge makeup wedge and use it to get a nice gradient. The advantage of using a sponge to apply your glitter gradient is that the sponge soaks up a lot of the clear suspension base from your glitter topper, which makes it less thick and gloopy on the nail, which in turn means less layers of top coat needed to smooth out your bumpy glitter gradient mound and slightly easier removal when you're done. Yay!
Totally Textured
Finally we're at the end of my list of easy nail art patterns to try out and I've saved my two faves for last! These 'texture' ideas are absolutely brilliant bases for MOAR nail art on top, but they also look great all on their own. |
| from Emma at Manicurity |
 |
| from Debbie at The Crumpet |

So there you have it, 12 easy nail art patterns to try! To take your nail art game to the next level, try layering these different patterns together for a more complex look.
We hope this post have been useful and informative for you! Do you agree that these are easy nail patterns, or is there a different pattern or technique you would recommend? I just realized I left out 'ombre', where you paint every nail a different shade of the same color, but I don't know that I really consider that a 'nail art pattern'. Anyhoo, feel free to leave us questions or feedback in the comments, we'd love to hear from you! If you do nail art inspired by this post please share with us on our Facebook page or on Twitter!

