
Hey guys! This is Missy from Gnarly Gnails bringing you our first 'How To' segment!
Today we are going to talk about....

Now let's be honest...most people HATE doing tape manicures. After all, that is part of the reason we decided to tackle the subject!
Hopefully you can learn a few tips here to help you with yours. Mostly, you need patience. And that's just not something you can buy at the nail art supply store!
There are a TON of different ways you can use striping tape. You can colorblock, do some simple stripes, get crazy art deco, make a cool fishnet design or just place it right on top of your finished nail. The possibilities are almost endless...let's look at some great tutorials and ideas: First up is a Reverse Stripe Manicure Tutorial from myself, Missy:

1 - Paint your base coats and any accent nails you may want to have for the mani.
2 - On the nails you want to do the reverse stripe on, paint a different color down half the nail vertically. Allow to fully FULLY dry. Applying quick dry top coat can help speed this up. Note - using polishes that are opaque in one coat helps.
3 - Apply your striping tape horizontally, making sure its stuck down good, especially on the edges that meet your skin. Crease it in there good with your fingernail or an orangewood stick.
4 - Paint opposite colors of your base. If you do black and white, do white over the black and black over the white.
5 - Paint the other half of the nail
6 - Remove your tape!
Let dry a few minutes and then apply your top coat and you are set!
Here is a fantastic color-blocking tutorial from Jacki of Adventures on Acetone:

Step 1) Paint your entire nail with two coats of Zoya Loredana. Top with one coat of quick dry top coat to speed up the drying process. I've used Seche Vite. Let dry completely before moving on.
Step 2) Cut three pieces of striping tape and apply on the nail to make rectangular sections. Make sure to overlap a bit so you will get a clean line. Press and smooth down gently.
Step 3) Tear the makeup sponge into little pieces. Then, paint Zoya Carter directly onto one of the sponge bits and dab the sponge to fill in one of the rectangles. You can always paint directly onto the nail, but this adds more texture and dries quicker. Make sure you do this enough times for the base color to be covered in that section.
Step 4) Grab a new piece of torn sponge and do the same with Zoya Arabella in another rectangular section.
Step 5) Grab another new piece of torn makeup sponge and do the same with Zoya Chita in another rectangular section. Be careful to not overlap the tape into another section.
Step 6) Finally, do the same with the Kiko 644 to fill in the last rectangle on the nail.
Step 7) Carefully peel the striping tape up one piece at a time in the direction of the tape so you keep a clean line where there is no textured polish. Don't forget to do the first piece you put on the nail as the last one to be pulled up.
And you're done! No need for top coat, we want the texture in this mani!!
Sue, from Creative Nail Design by Sue has some great tape manis and tips for us:

Here are two different uses of striping tape. My rules of striping tape
1) Allow a decent amount of time since the process requires time and patience.
2) Do the base coat the night before whenever possible to allow it to thoroughly dry.
3) Cut off the strips of tape all in advance and stick them to the edge of a table so you don't damage your polished nails during the process trying to cut tape.
4) Make sure you have the tape stuck firmly to the nail on all edges and also at the edges of the nails where it is most apt to lift. Victoria from The Manicurator once gave me a great tip to use a doting tool to press around the edges of the nail over the tape.
5) Remember the order you laid down the tape because once polished, you may not be able to tell.
6) Peel the tape up gently while the polish is still wet.
7) Keep calm!!! Patience makes the process easier.
Now here is a new(ish) thing in the nail community - this is something that I made after seeing it on Lace & Lacquers' Instagram profile - you take all of your rolls of striping tape and put them inside a tape dispenser! Talk about GENIUS and easy to work with!

Here is a great tape mani from Meghan of Will Paint Nails for Food:

About the tape: This is a single roll of silver striping tape. It has a holographic effect, which I really like. It's about 1mm wide and you get a sizeable amount on one roll. I know you can find cheap striping tape on eBay or Amazon where you get 12 rolls of tape, but I like that you can get them individually. That way you can only buy the colours you want, or just buy one roll to try it out first.
I applied a coat of Seche Vite, waited for it to dry then taped off the sections where I wanted the darker blue. For that I used Lacquer Lust Pow Chica Wow Wow, a navy blue linear holo. The striping tape was applied when everything was dry. I just made sure to line up the edge of the tape on one end, then trim with small scissors on the other end. On my accent nail I used Fanchromatic Nails Broken Holo Theory, a silver holo glitter topper with micro-glitter and shards.
Here are a couple of great tape designs by Jolène of Follow Gashin:

Most people associate striping tape with meticulous geometric patterns, myself included. But you don't need to go cross-eyed in order to use striping tape. I've used it twice now to block off space -- the sunbeams in the first mani you see here, and the random sections in the second mani. You still do need a steady hand and a good pair of tweezers, but it relieves some of the pressure of getting thin, finicky tape to do exactly what you want it to. And important note, though: if you're going to overlap striping tape in any way, remember what order you put the strips down in! In order to avoid pulling and other nastiness, you'll need to take your tape bits off in the reverse order to which you put them down.
A fabulous textured tutorial from Jacki of Adventures in Acetone:

Step 1) Paint two coats of Elevation Polish Tavan Bogd and let dry completely before moving onto the next step (or add a coat of quick dry top coat to shorten the wait time).
Step 2) Cut three pieces of striping tape and lay diagonally across the nail in parallel stripes. Press down firmly.
Step 3) Cut three more pieces of striping tape and lay diagonally across the nail the opposite direction from the last step. This should give you some diamond shapes between the striping tape. Press down firmly.
Step 4) Use all three Sally Hansen Sugar Coat polishes to paint stripes onto the end of the makeup sponge. The first coat will be absorbed into the sponge so you will want to do a second coat. Make sure you have the stripes touching, or even overlapping the tiniest bit, so there aren't any bare parts on the sponge.
Step 5) While the sponge is still wet, press down flat on the nail. Pull straight up again without dragging the sponge on the nail. I like to do step 4 and 5 two times to get a good amount of polish on the nail and over the striping tape.
Step 6) Slowly peel off the striping tape in the direction of the tape. Make sure to peel up the second set of tape and not the first set. The second set is crossed over the first set so you have to take the tape off in the reverse order of how you applied it.
Step 7) Finally, peel the tape off carefully from the first set. This should reveal a fun, raised texture of diamonds/quilting and clean lines of the purple base color.
And YOU'RE DONE! No top coat for this design, the texture is the best part of it! 
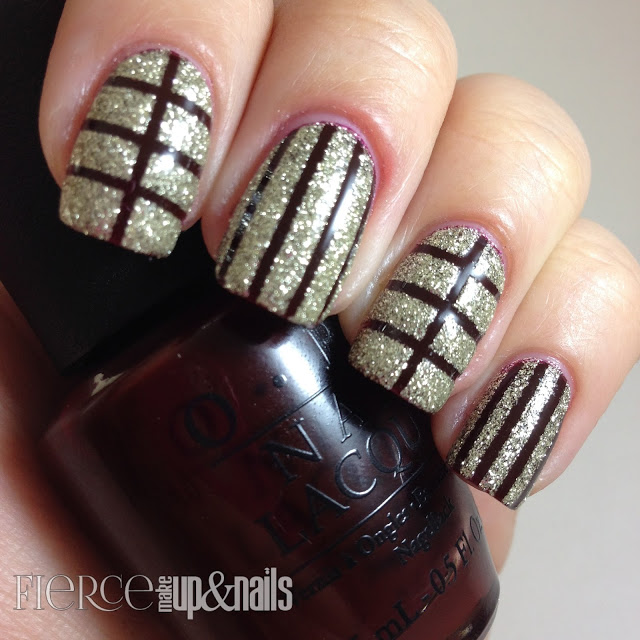
Here is a stunning use of creams and glitters to make gorgeous tape designs, as done by Nory of Fierce Makeup and Nails:
Lindsey of Wondrously Polished has this great mani and advice on tape manis:

My biggest struggle with striping manicures is the bleeding that occurs underneath the tape. While it's nearly impossible to avoid this completely, one of the best ways to combat this is to use a top coat after your base color. From here, you'll complete your tape manicure as normal (tape your design, paint your colors, remove the tape). If any polish bleeds under the tape, take an angled brush dipped in acetone and carefully remove any out of place polish. The top coat you added will provide enough protection from the acetone that you can remove the top color without damaging the base color. Keep in mind that this only works to a certain extent - if you remove too much of the top coat, you'll eventually reach the base color and may have to restart anyway. When you're satisfied with the cleanliness of your lines, add one final top coat and you're done! While this method will use more top coat than normal, it beats redoing your manicure 3 times
This is a tutorial that mixes it up a bit, using a striping tape technique as well as a DIY decal technique by Me again, at Gnarly Gnails (full tutorial on this and the decal HERE):

1 - Have your decal prepared ahead of time
2 - Paint your base color and allow to thoroughly dry, then place your tape down by eyeballing where the decal will be and placing your tapes AROUND that area only leading up TO where it will be.
3 - Sponge on polish in a contrasting color ONLY around the edges of your nail
4 - Continue to sponge until you have the desired opacity you want
5 - Remove your tapes
6 - In the area your decal will go, apply some top coat
7 - Place your decal over your topcoated area and make sure to adhere it by pressing down on your finger or whatever you might like to use. Don't spend too much time or pressure doing this, as it IS polish, it will start to melt/show fingerprints if you manipulate it too much. Once its in place, apply a quick dry top coat to seal the decal in.
8 - After your quick dry top coat, apply a matte top coat (the reason we do the quick dry first is so none of our art smears, this tends to happen when matte top coat is applied directly over art)
9 - VOILA!
Victoria of Manicurator is a tape guru! Check out some of her past manicures with striping tape:

Vic of glowstars.net is our resident Bling Queen and she is no stranger to doing some killer tape manis too - check some of her past examples out, as well as HER advice on using tape:

My tip is lots of patience and lots of practice. Oh, and a sharp pair of cuticle nippers for cutting off excess once it's on the nail. Now if anyone can tell me how the hell I can get the stuff to wrap over the tips and actually stick, I'll probably be a master...
And if those weren't more than enough ideas to get you started, we also have a Round Up of our Tape Week you can check out HERE!

